My shopping cart
Your cart is currently empty.
Continue ShoppingPourover can be intimidating. We have to worry about timing, weight, water temperature, grind size... and the list continues. In reality, for those that want to start learning to brew, let's go with the simplest method that I think can become the BEST pourover technique.
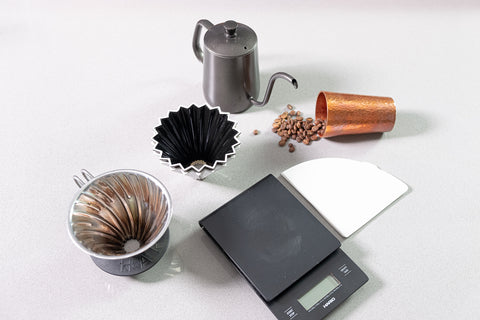
What you will need
Cone Shaped Dripper - v60 | Chemex | Origami
Filter for your preferred dripper
Scale
Gooseneck Kettle
Ground Beans

This is my set up, I either use the Hario v60-02 or the Origami small for my pourovers. Today's guide will focus on the Hario v60-02 since it's the standard go to dripper. I have the Hario scale but honestly you could use a flour scale if that's all you have.
Recipe
20g | Medium Fine Beans
300g | 89 - 92 Celsius water
Honestly coffee is pretty simple we only need to have two ingredients and we can make a good cup of coffee! Just ground coffee beans and water.
First off we need to fold the filter. Now for the Hario filters they actually fit a little awkward into the dripper. You'll want to fold a little more on the top and it will sit perfectly. Here's a picture of how I like to fold my filter paper.

Notice I pull the top a little further in, but keep the bottom right against the fold line. We always preheat the filter with some hot water. This allows the filter to sit nice and tight against the dripper while retaining the heat during the brew. Some people do it because they think the paper has a bit of flavour to it, it may, I don't really notice but no matter what it's very helpful to just rinse the filter before you brew the coffee.

That's how my filter looks like when it's set. It's sitting perfectly against the walls of the dripper. This will guarantee your coffee won't be disturbed during the brew process because of a bumpy part on the filter.

Next would be to setting the grinds. You'll want to set the grinds with a small little divot in the middle. This allows the beans to catch the water best! Having set the grounds you'll want to pour very slowly from the middle and then work your way out to the edges. Once you hit the edges you'll do a flush pour and then stir! Now you let it drain and serve!


This is the flush pour - that's when you pour down the walls of the dripper to flush all the side floating grinds down!

The stir is very quick, from outside to inside and top to bottom. Just make sure not to poke a hole through the bottom!

Serve and enjoy your coffee!